Testing EOSIO smart contracts with Hydra
Testing EOSIO smart contracts was always a big pain point for me and many other developers, especially newcomers. I probably spent more time setting up and managing local testnets, or writing shell scripts to automate this process, than actually writing the smart contract.
There are currently some testing frameworks that try to make this process easier, but they are all just a wrapper on top of your local EOSIO node’s chain_api. This means you are still required to have EOSIO installed locally, correctly set up, and ensure it is running whenever you run your tests. This comes with all the restrictions, limitations and disadvantages of running a local blockchain:
- Require EOSIO and/or Docker to be installed on your system, making it infeasible to run on low-resource systems like CI pipelines.
- Running a local blockchain requires significant CPU and storage resources, slowing down the rest of your system.
- Cannot run tests in parallel because all operate on the same local blockchain node.
- You are restricted to the 500ms block production time, even though your transactions might run in microseconds.
Over a year ago I had the idea of creating a testing environment that just uses a WebAssembly interpreter like EOSVM to execute the compiled smart contract - removing all features that are not necessary for executing transactions, such as block production, CPU/NET/RAM and other resource billing.
I’m excited to announce that I finally had the opportunity to work on this with the Klevoya Team and release the first version of Hydra today. 🎊
Hydra Features
Hydra is a simple and fast EOSIO smart contract test and execution environment. With Hydra you can quickly create and execute test cases without needing to maintain and run a local blockchain. All within minutes. - Hydra
Some of Hydra’s features include:
- Test EOSIO smart contracts without running a local node
- Run tests in parallel. Run integration tests in CI.
- Bootstrap command to quickly get started with testing your smart contracts
- Load initial contract table data through JSON files
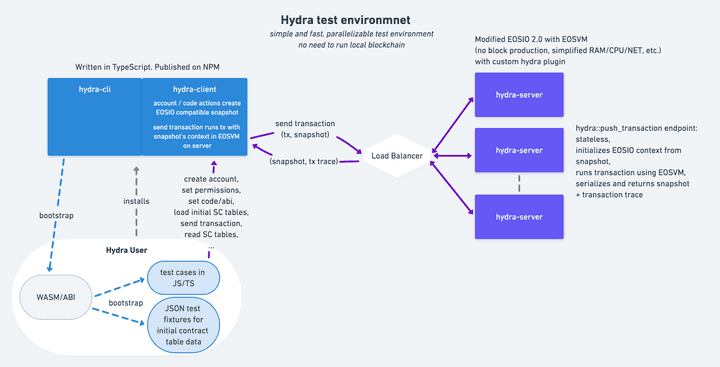
The way Hydra works is by creating a local EOSIO-compatible snapshot whenever an action like creating accounts or deploying contracts is done. To run a transaction it communicates with the backend to simulate all EOSIO checks and execute the transaction in the EOSVM with the snapshot’s context. The updated snapshot, which can contain updated contract tables or even new account creations from running the contract code, is returned and usable by the client.
Example Test
Hydra is written in NodeJS and tests are written in JavaScript or TypeScript.
The Hydra CLI can be used to quickly bootstrap tests for smart contracts through the init command, which allows you to select which contracts you want to test and what tables you want to fill with initial data.
Let’s test something a bit more complicated than an eosio.token contract to showcase the strength of Hydra. In reality, most dapps consist of several smart contracts that interact with each other in a certain way. For example, the open-source Bancor protocol allows anyone to trade tokens without an order-book and finding a trading counterparty. The price of the trade is set by the Bancor protocol and changes based on the liquidity of the tokens provided. It consists of several contracts:
- A multi-token contract: This is just a standard eosio.token contract that manages multiple tokens.
- The Bancor Network token (BNT) which acts as a base token for every trade.
- Some token we want to be able to trade for
BNT, let’s call it theAAAAtoken.
- The Bancor Network contract: It’s the entry point for any Bancor trade and the funds need to be sent to this contract.
- A multi-converter contract: This is the brain of all contracts that holds the funds (called “reserve”) for all tradable tokens and does the conversion. We can’t directly trade
BNTtokens for ourAAAAtokens though, there is an intermediate token for each trading pair (called a smart token), in our caseBNTAAAA. I won’t go into details why this token exists, it’s enough to know that it exists and tradingBNTforAAAAtheoretically tradesBNT->BNTAAAA->AAAA.
For comparison, the way Bancor is currently tested is by first creating all the accounts, tokens, and setting the code by running three shell scripts which themself run cleos commands. You’ll need to reset your local blockchain after every test and run these scripts again.
The actual tests are written in JavaScript using eosjs to communicate with the local nodeos. A lot of helper functions were defined to make working with eosjs easier.
Let’s write a test using Hydra that sets all of this up, and then trades BNT for AAAA and we’ll see if the math checks out. ✅
After compiling the Bancor contracts, we can run the hydra init command, selecting the BancorConverter and BancorNetwork contracts as the contracts to scaffold tests for.
The init command creates a tests/BancorConverter.test.js file, the hydra.yml config file, and installs jest, a modern JavaScript testing framework.
We edit the example test file to create the accounts and set the contracts:
const { loadConfig, Blockchain } = require('@klevoya/hydra')

const config = loadConfig('hydra.yml')

describe('BancorConverter', () => {
  // creates a new blockchain context that stores which accounts, contracts, etc. exist
  let blockchain = new Blockchain(config)
  // creates a new account on the blockchain
  let token = blockchain.createAccount(`token`)
  let network = blockchain.createAccount(`network`)
  let converter = blockchain.createAccount(`converter`)
  let creator = blockchain.createAccount(`creator`)
  let user1 = blockchain.createAccount(`user1`)

  const ASymbol = { code: `AAAA`, precision: 4 }
  const BNTSymbol = { code: `BNT`, precision: 10 }
  const SmartSymbol = { code: `BNTAAAA`, precision: 4 }

  beforeAll(async () => {
    // deploys the BancorConverter contract to the account
    // the contract templates are defined in the hydra.yml config file
    tester.setContract(blockchain.contractTemplates[`BancorConverter`])
    // adds eosio.code permission to active permission
    tester.updateAuth(`active`, `owner`, {
      accounts: [
        {
          permission: { actor: tester.accountName, permission: `eosio.code` },
          weight: 1,
        },
      ],
    })

    converter.setContract(blockchain.contractTemplates[`BancorConverter`])
    network.setContract(blockchain.contractTemplates[`BancorNetwork`])
  })

  it('can send the delreserve action', async () => {
    // some example test
  })
})
Creating initial tokens
Equipping accounts with some initial token balances is needed a lot in testing and Hydra makes this especially easy with its initial table loading feature.
We will create JSON files for the eosio.token’s accounts and stat table and provide our test accounts with initial balances.
The JSON fixures must be placed in the tests/fixtures/eosio.token directory:
// stat.json create initial tokens
{
  // AAAA is the scope, then the rows follow
  "AAAA": [
    {
      "supply": "270.6013 AAAA",
      "max_supply": "10000000000.0000 AAAA",
      "issuer": "token"
    }
  ],
  "BNT": [
    {
      "supply": "1000.0000000000 BNT",
      "max_supply": "250000000.0000000000 BNT",
      "issuer": "token"
    }
  ]
}
Here, we created the AAAA and BNT tokens, and we can now define the actual balances for accounts in the accounts.json file:
// accounts.json
{
  // creator is the scope (account holding the balance), then the rows follow
  "creator": [
    { "balance": "10.0000 AAAA" },
    { "balance": "10.0000000000 BNT" }
  ],
  "user1": [
    { "balance": "0.0000 AAAA" },
    { "balance": "100.0000000000 BNT" },
    { "balance": "0.0000 BNTAAAA" }
  ]
}
To load this JSON data, we create the token account, deploy the eosio.token contract, one of the pre-defined contract templates, and call loadFixtures().
This is a lot more convenient than writing down all the create, issue, and transfer actions required to bring the blockchain into the same state.
The feature to load table data from JSON files requires adding a helper function to your smart contract. Read more about it here.
describe("BancorConverter", () => {
  // ...

  beforeAll(async () => {
    // ...
    // this loads the stat and accounts table defined in the
    // fixtures/eosio.token/stat|accounts.json files
    await token.loadFixtures();
  })
}
Setting up Bancor
As the next step, we can write our first test to set up the Bancor converter.
it("can set up converters", async () => {
    expect.assertions(2);

    // init network account
    await network.contract.setnettoken({
      network_token: token.accountName // the account managing BNT token
    });
    // init converter
    await converter.contract.setnetwork({
      network: network.accountName
    });
    await converter.contract.setmultitokn({
      multi_token: token.accountName
    });
    // this creates the BNTAAAA smart token
    await converter.contract.create(
      {
        owner: creator.accountName,
        token_code: `BNTAAAA`,
        initial_supply: `10.0000`
      },
      // owner must sign, so we set the authorization
      [{ actor: creator.accountName, permission: `active` }]
    );

    expect(
      // returns the entries of the BNTAAAA scope of the converters table
      converter.getTableRowsScoped(`converters`)[`BNTAAAA`]
    ).toEqual([
      {
        currency: "4,BNTAAAA",
        fee: "0",
        owner: "creator",
        stake_enabled: false
      }
    ]);

    await converter.contract.setreserve(
      {
        converter_currency_code: `BNTAAAA`,
        currency: "10,BNT",
        contract: token.accountName,
        ratio: 500000
      },
      [{ actor: creator.accountName, permission: `active` }]
    );
    // same for AAAA token

    await token.contract.transfer(
      {
        from: creator.accountName,
        to: converter.accountName,
        quantity: "10.0000000000 BNT",
        memo: "fund;BNTAAAA"
      },
      [{ actor: creator.accountName, permission: `active` }]
    );
    // same for AAAA token

    // funded converter with 10 BNT and 10 AAAA tokens
    expect(converter.getTableRowsScoped(`reserves`)[SmartSymbol.code]).toEqual([
      {
        balance: "10.0000000000 BNT",
        contract: "token",
        ratio: "500000"
      },
      {
        balance: "10.0000 AAAA",
        contract: "token",
        ratio: "500000"
      }
    ]);
  });
})
First, we run some actions on the converter contract, which can be done by accessing the converter.contract object and specifying the action to invoke with its data.
The authorization defaults to the contract account’s active permission and can be changed by passing a second authorization argument.
After running these actions, we check the contract’s table data using the account.getTableRowsScoped method.
As the name suggests, it returns the table data for the specified table name as a mapping from scopes to data entries.
Submitting the trade
We can add another test executing a trade and check if the Bancor algorithm was correctly implemented.
So far, we have 10 BNT and 10 AAAA tokens in the converter’s funds.
If a user puts in 20 more BNT, they are responsible for 2/3 of the BNT funds.
This allows them to take out 2/3 of the AAAA funds, so we’d expect 6.6666 AAAA to be returned.
it("can convert BNT to AAAA", async () => {
  expect.assertions(1);
  const buildMemo = ({ relay, toSymbolCode, minReturn, toAccount }) =>
    `1,${relay}:BNTAAAA AAAA,${minReturn},${toAccount}`;

  const bntToConvert = `20.0000000000 BNT`;
  // convert BNT to AAAA (actually BNT -> BNTAAAA -> AAAA)
  await token.contract.transfer(
    {
      from: user1.accountName,
      to: network.accountName, // all trades must go through network account
      quantity: bntToConvert,
      memo: buildMemo({
        relay: converter.accountName,
        toSymbolCode: SmartSymbol.code,
        minReturn: `6.0000`,
        toAccount: user1.accountName
      })
    },
    // user1 must sign their transfer
    [{ actor: user1.accountName, permission: `active` }]
  );

  // manually computed as
  // input / (current_from_balance + input) * current_to_balance;
  // 20 BNT / (10 BNT + 20 BNT) * 10 AAAA = 2/3 * 10 AAAA
  const expectedATokenBalance = `6.6666 AAAA`
  expect(token.getTableRowsScoped(`accounts`)[user1.accountName]).toContainEqual({
    balance: expectedATokenBalance
  });
});
The test passes and we indeed get back the expected amount of AAAA tokens, increasing the price of AAAA tokens for the next user.
The complete test file used for this example can be seen in this GitHub gist and turns out to be less than 200 LoC.
Hydra allowed us to easily write tests without any additional setup scripts or local blockchain.
If you want to learn more about Hydra check out the FAQ or dive right into the documentation.


